首先,配置R1和R2设备的ip地址是基础步骤。假设R1的接口e0/0配置为12.1.1.1,R2的接口e0/0配置为12.1.1.2。通过简单的命令,如`ip add`和`no shutdown`,确保接口启用并分配正确的IP地址。
接下来,配置IKE(Internet Key Exchange)第一阶段策略。这一阶段主要负责建立安全通道。在R1上,可以通过`crypto isakmp policy 10`命令创建策略,并设置加密算法(如3DES)、散列算法(如SHA256)、DH交换组(如group 5)和认证方式(如预共享密钥)。同样,R2也需要进行相应的配置,确保两端的策略一致。
在第一阶段策略配置完成后,需要设置预共享密钥。通过`crypto isakmp key`命令,分别在R1和R2上配置相同的密钥,如“CCIE”,并指定对端IP地址。这一步骤是双方建立信任关系的关键。
随后,进入IKE第二阶段策略的配置。首先,定义感兴趣流,即需要加密的数据流。通过`ip Access-list extended`命令创建访问控制列表,指定允许的IP流量。然后,配置传输集,使用`crypto ipsec transform-set`命令定义封装方式(如ESP)、加密算法(如DES)和完整性校验算法(如MD5-HMAC)。
最后,创建加密视图`crypto map`,将传输集与感兴趣流关联,并应用到接口上。通过`crypto map`命令,设置对端设备、匹配的访问控制列表和传输集。在R1和R2的接口e0/0上应用这些加密视图,确保数据流经过加密处理。
配置完成后,可以通过抓包工具验证加密效果。初始状态下,数据以明文传输;配置IPSec后,数据会被ESP或AH封装,确保安全性。若需更改封装方式,如从ESP改为AH,需重新配置传输集并清除现有的安全关联(`clear crypto sa`)。
总结来说,Site-to-Site VPN的IPSec配置涉及IP地址设置、IKE第一阶段和第二阶段策略配置、预共享密钥设置以及加密视图的应用。掌握这些步骤,可以在不同网络间建立安全、可靠的连接,保障数据传输的安全性。在实际应用中,根据具体需求选择合适的封装模式和算法,确保网络的高效运行。
01、Site To Site 经典IPSec配置
1. 配置R1、R2设备IP地址
R1(config) int e0/0
R1(config-if) ip add 12.1.1.1 255.255.255.0
R1(config-if) no shutdown

R2(config) int e0/0
R2(config-if) ip add 12.1.1.2 255.255.255.0
R2(config-if) no shutdown
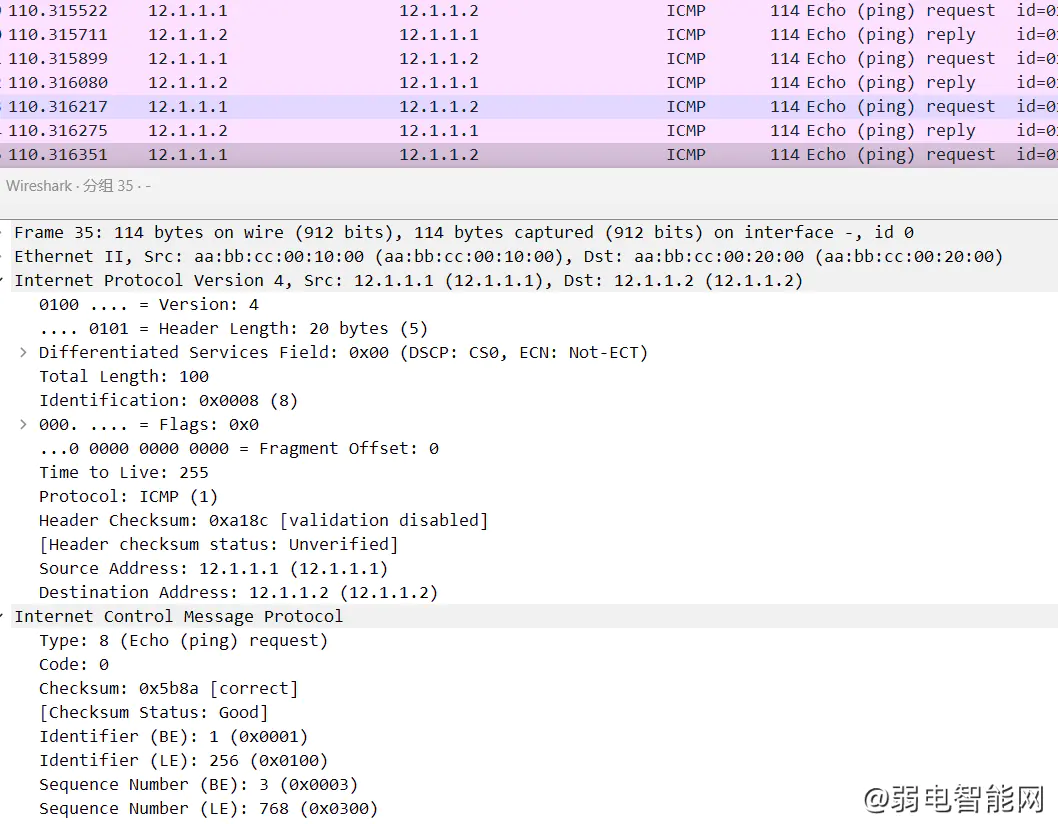
此时,在PC1上ping PC2时,抓包可发现,数据都是明文可现。
2. 配置IKE第一阶段策略
 设置策略10
R1(config) crypto isakmp policy 10
R1(config-isakmp) ?
ISAKMP commands:
authentication Set authentication method for protection suite
default Set a command to its defaults
encryption Set encryption algorithm for protection suite
exit Exit from ISAKMP protection suite configuration mode
group Set the Diffie-Hellman group
hash Set hash algorithm for protection suite
lifetime Set lifetime for ISAKMP security association
no Negate a command or set its defaults

 数据包加密算法使用3DES(默认DES)
R1(config-isakmp) encryption ?
3des Three key triple DES
aes AES - Advanced Encryption Standard.
des DES - Data Encryption Standard (56 bit keys).

R1(config-isakmp) encryption 3des

 散列算法使用sha256
R1(config-isakmp) hash ?
md5 Message Digest 5
sha Secure Hash Standard
sha256 Secure Hash Standard 2 (256 bit)
sha384 Secure Hash Standard 2 (384 bit)
sha512 Secure Hash Standard 2 (512 bit)

R1(config-isakmp) hash sha256

 DH交换使用group 5
R1(config-isakmp) group ?
1 Diffie-Hellman group 1 (768 bit)
14 Diffie-Hellman group 14 (2048 bit)
15 Diffie-Hellman group 15 (3072 bit)
16 Diffie-Hellman group 16 (4096 bit)
19 Diffie-Hellman group 19 (256 bit ecp)
2 Diffie-Hellman group 2 (1024 bit)
20 Diffie-Hellman group 20 (384 bit ecp)
21 Diffie-Hellman group 21 (521 bit ecp)
24 Diffie-Hellman group 24 (2048 bit, 256 bit subgroup)
5 Diffie-Hellman group 5 (1536 bit)

R1(config-isakmp) group 5(默认group 1)

 认证方式配置为预共享密钥认证
R1(config-isakmp) authentication ?
pre-share Pre-Shared Key
rsa-encr Rivest-Shamir-Adleman Encryption
rsa-sig Rivest-Shamir-Adleman Signature

R1(config-isakmp) authentication pre-share

 lifetime 配置为6000,默认为86400,不建议修改。
R1(config-isakmp) lifetime ?
<60-86400> lifetime in seconds

R1(config-isakmp) lifetime 6000
下面还可以在路由器R1、R2上再次创建多套不同的策略20、30……,因为做实验,为了方便,故使得R2上策略与R1上策略10一样。
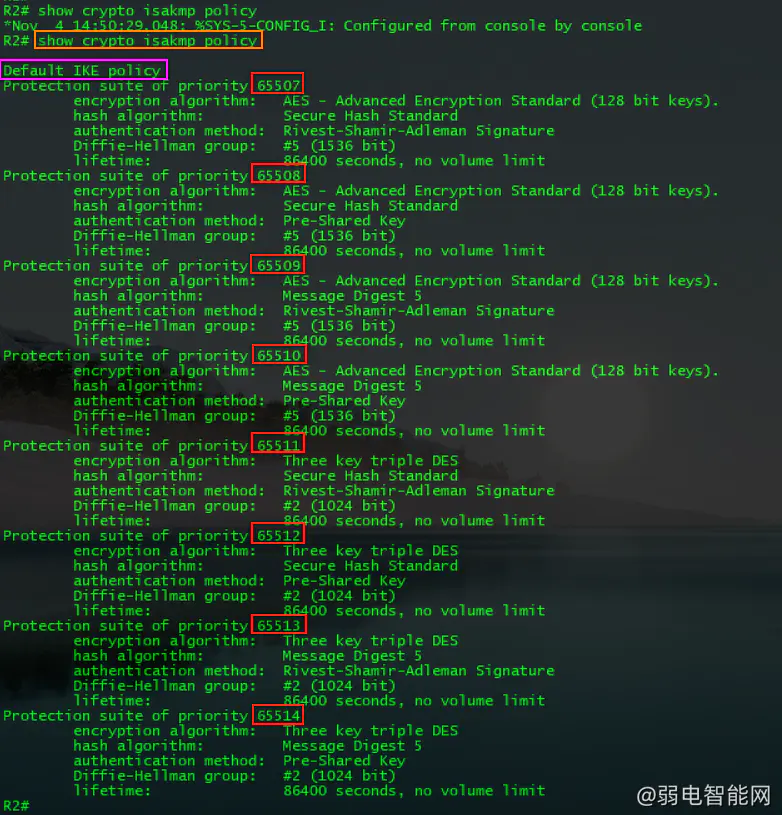
上图是R2上默认的几套策略,当我手动配置完策略10时,再次查看可发现:
 R2上配置策略 10(与R1上配置一样)
R2(config) crypto isakmp policy 10
R2(config-isakmp) encryption 3des
R2(config-isakmp) hash sha256
R2(config-isakmp) authentication pre-share
R2(config-isakmp) group 5
R2(config-isakmp) lifetime 60000
3.在第一阶段策略基础之上配置双方预共享密钥
 配置预共享密钥为CCIE(该key仅仅用于认证),后接对端IP地址。
R1(config) crypto isakmp key CCIE address 12.1.1.2
 配置预共享密钥为CCIE(该key仅仅用于认证),后接对端IP地址
R2(config) crypto isakmp key CCIE address 12.1.1.1
4. 配置IKE第二阶段策略(3步走)
 配置感兴趣流(满足感兴趣流的数据会被加密,也就是通信点之间的流量)
R1(config) ip access-list extended 100
R1(config-ext-nacl) permit ip host 12.1.1.1 host 12.1.1.2

 配置阶段二的传输集名称为SET,封装使用ESP,加密使用DES,完整性校验使用MD5-HMAC
R1(config) crypto ipsec transform-set SET esp-des esp-md5-hmac

 配置加密视图 crypto map

R1(config) crypto map CCNP 10 ipsec-isakmp
 设置加密视图名称和策略号 CCNP 10
R1(config-crypto-map) set peer 12.1.1.2
 设置和哪一个设备建立VPN
R1(config-crypto-map) match address 100
 匹配阶段2感兴趣流
R1(config-crypto-map) set transform-set SET
 关联阶段2的传输集SET

以下配置可选
R1(config-crypto-map) set pfs group5
 启用PFS
R1(config-crypto-map)set security-association lifetime seconds 1800
 设置IPSec SA的生存期
 配置感兴趣流(满足感兴趣流的数据会被加密,也就是通信点之间的流量)
R2(config) ip access-list extended 100(此名100本地有效,无需和R1相同)
R2(config-ext-nacl) permit ip host 12.1.1.2 host 12.1.1.1

 配置阶段二的传输集名称为SET(此名SET本地有效,无需和R1相同),封装使用ESP,加密使用DES,完整性校验使用MD5-HMAC
R2(config) crypto ipsec transform-set SET esp-des esp-md5-hmac

 配置加密视图 crypto map
R2(config) crypto map CCNP 10 ipsec-isakmp
(此名CCNP本地有效,无需和R1相同)

R2(config-crypto-map) set peer 12.1.1.1
R2(config-crypto-map) match address 100
R2(config-crypto-map) set transform-set SET

以下配置可选
R2(config-crypto-map) set security-association lifetime seconds 1800
R2(config-crypto-map) set pfs group5
5. 接口调用crypto map
R1(config) int e0/0
R1(config-if) crypto map CCNP

R2(config) int e0/0
R2(config-if) crypto map CCNP
最终,R1再次ping R2时,依然能够ping通,只是具体的ICMP数据经过ESP封装后,已经看不见了。
此时,假设我将ESP封装改为AH封装,抓包时,依然会发现,还是被ESP加密了,貌似更改后的AH封装并没有被触发生效。
R1(config) crypto ipsec transform-set SET ah-md5-hmac
R2(config) crypto ipsec transform-set SET ah-md5-hmac
这时要想使AH封装生效,则:
R1 clear crypto sa
R2 clear crypto sa
此时可发现,经AH封装的ICMP数据以明文显示。
02、进阶版Site To Site 经典IPSec配置
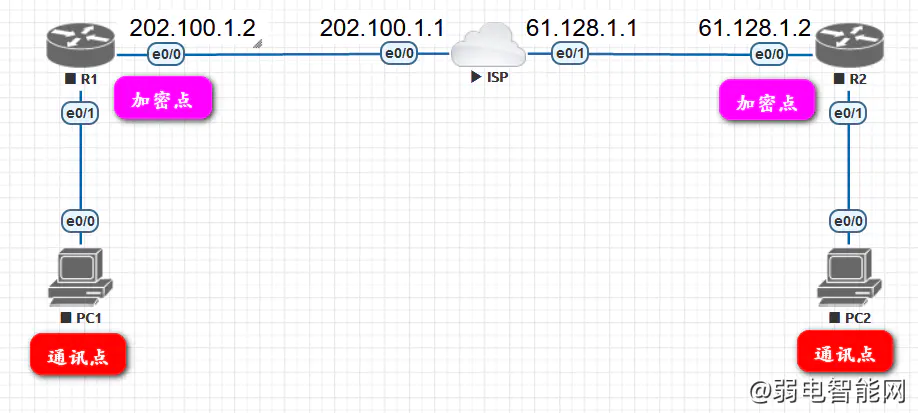
1.配置IP地址
R1(config) int e0/0
R1(config-if) ip add 202.100.1.2 255.255.255.0
R1(config-if) no shutdown

ISP(config) int e0/0
ISP(config-if) ip add 202.100.1.1 255.255.255.0
ISP(config-if) no shutdown

ISP(config) int e0/1
ISP(config-if) ip add 61.128.1.1 255.255.255.0
ISP(config-if) no shutdown

R2(config) int e0/0
R2(config-if)ip add 61.128.1.2 255.255.255.0
R2(config-if) no shutdown
2.实现R1、R2站点之间互通
 去往远端加密点的IP路由
R1(config) ip route 61.128.1.0 255.255.255.0 202.100.1.1
R2(config) ip route 202.100.1.0 255.255.255.0 61.128.1.1
3. 配置IKE第一阶段策略
R1(config) crypto isakmp policy 10
R1(config-isakmp) encryption 3des
R1(config-isakmp) authentication pre-share
R1(config-isakmp) group ?
1 Diffie-Hellman group 1 (768 bit)
14 Diffie-Hellman group 14 (2048 bit)
15 Diffie-Hellman group 15 (3072 bit)
16 Diffie-Hellman group 16 (4096 bit)
19 Diffie-Hellman group 19 (256 bit ecp)
2 Diffie-Hellman group 2 (1024 bit)
20 Diffie-Hellman group 20 (384 bit ecp)
21 Diffie-Hellman group 21 (521 bit ecp)
24 Diffie-Hellman group 24 (2048 bit, 256 bit subgroup)
5 Diffie-Hellman group 5 (1536 bit)

R1(config-isakmp) group 2
R1(config-isakmp) hash md5

R2(config) crypto isakmp policy 10
R2(config-isakmp) encr 3des
R2(config-isakmp) hash md5
R2(config-isakmp) authentication pre-share
R2(config-isakmp) group 2
4.在第一阶段策略基础之上配置双方预共享密钥
R1(config) crypto isakmp key CCIE address 61.128.1.2
R2(config) crypto isakmp key CCIE address 202.100.1.2
5. 配置IKE第二阶段策略
R1(config) crypto ipsec transform-set TRANS ah-md5-hmac
R1(cfg-crypto-trans) exit

R1(config) ip access-list extended 100
R1(config-ext-nacl) permit ip host 202.100.1.2 host 61.128.1.2

R1(config) crypto map CRYMAP 10 ipsec-isakmp
R1(config-crypto-map) set peer 61.128.1.2
R1(config-crypto-map) match address 100

R1(config) crypto map CRYMAP 10 ipsec-isakmp
R1(config-crypto-map) set transform-set TRANS

R1(config) int e0/0
R1(config-if) crypto map CRYMAP
R2(config) crypto ipsec transform-set TRANS ah-md5-hmac
R2(cfg-crypto-trans) exit

R2(config) ip access-list extended 100
R2(config-ext-nacl) permit ip host 61.128.1.2 host 202.100.1.2

R2(config) crypto map CRYMAP 10 ipsec-isakmp
R2(config-crypto-map) set peer 202.100.1.2
R2(config-crypto-map) match address 100

R2(config) crypto map CRYMAP 10 ipsec-isakmp
R2(config-crypto-map) set transform-set TRANS

R2(config) int e0/0
R2(config-if) crypto map CRYMAP
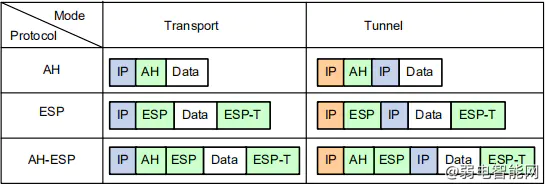
当通信点与加密点是一台设备时,建议使用传输模式。
当通信点与加密点不是一台设备时,必须使用隧道模式。
对于IPSec而言,需要解决3个路由问题:
1.去往本地通信点的路由
2.去往远端加密点路由
3.去往远端通信点路由
注:实际工作中,远端加密点、远端通信点可通过默认路由替代。
R1(config) int e0/1
R1(config-if) ip add 192.168.1.1 255.255.255.0
R1(config-if) no shutdown

 去往远端通信点的IP路由(前两个问题前面已经解决)
R1(config)ip route 192.168.2.0 255.255.255.0 202.100.1.1

 替换远端加密点与远端通信点
R1(config) ip route 0.0.0.0 0.0.0.0 202.100.1.1

R1(config)no access-list 100 permit ip host 202.100.1.2 host 61.128.1.2
 更改ACL,删除替换前面的ACL
R1(config) access-list 100 permit ip host 192.168.1.100 host 192.168.2.100
R2(config) int e0/1
R2(config-if) ip add 192.168.2.1 255.255.255.0
R2(config-if) no shutdown

 去往远端通信点的IP路由(前两个问题前面已经解决)
R2(config) ip route 192.168.1.0 255.255.255.0 61.128.1.1

 替换远端加密点与远端通信点
R2(config) ip route 0.0.0.0 0.0.0.0 61.128.1.1

R2(config)no access-list 100 permit ip host 61.128.1.2 host 202.100.1.2
 更改ACL,删除替换前面的ACL
R2(config) access-list 100 permit ip host 192.168.2.100 host 192.168.1.100
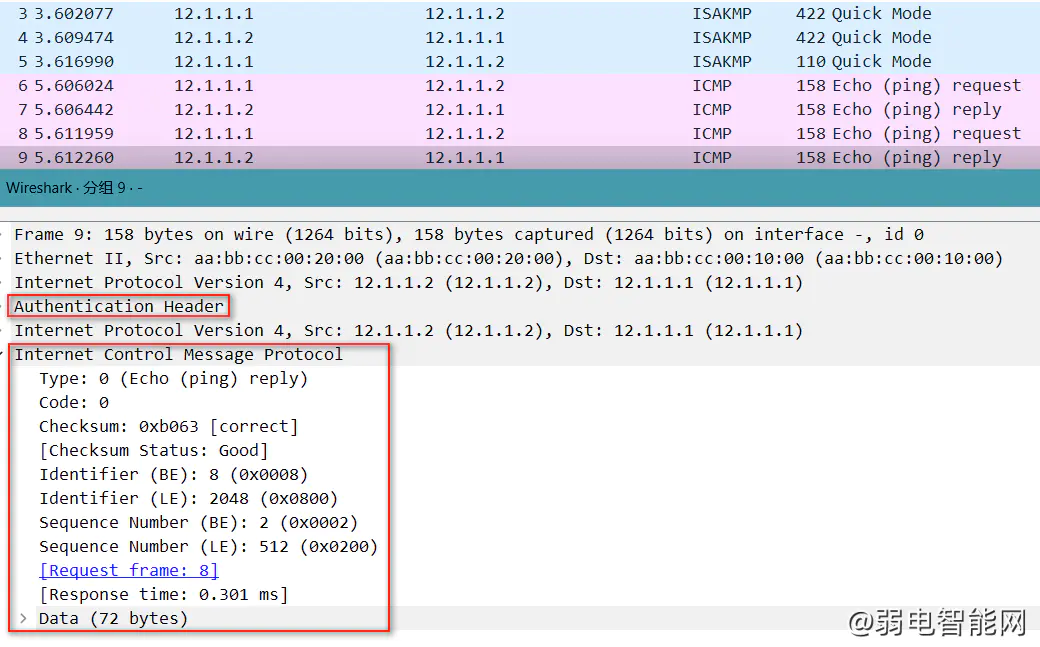
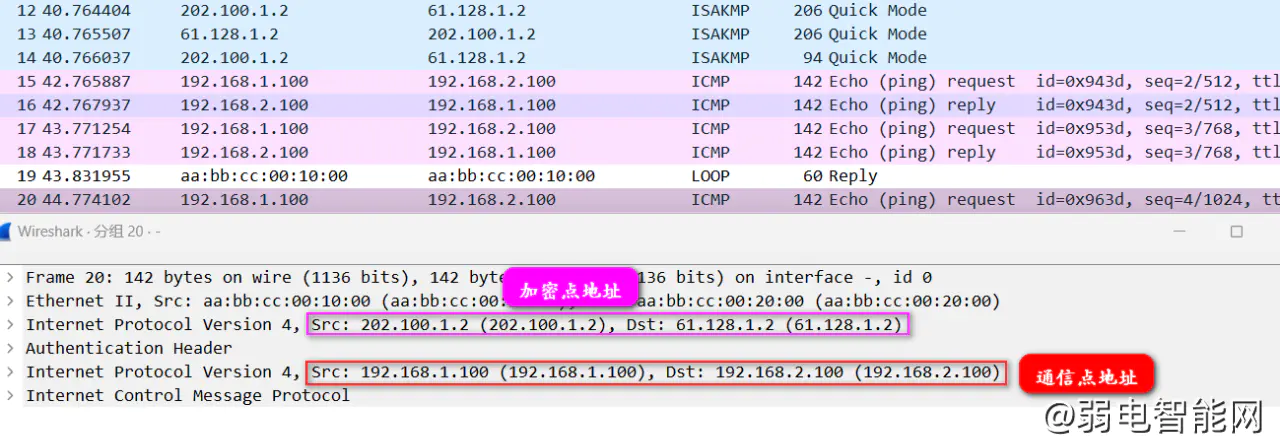
由上图抓包可知,内层封装的是通信点地址,经过AH加密封装后,外层封装的是加密点地址。
 R1上增加一条ACL
R1(config) access-list 100 permit ip host 202.100.1.2 host 61.128.1.2

R1 clear crypto sa
 R2上增加一条ACL
R2(config) access-list 100 permit ip host 61.128.1.2 host 202.100.1.2

R2 clear crypto sa
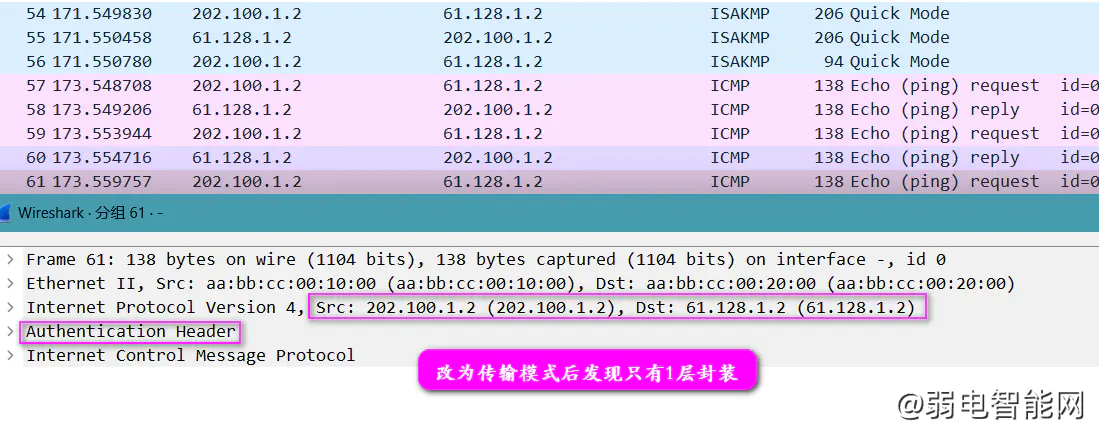
由抓包可知,内外两层IP地址都是一样的,完全没必要。下面修改模式(默认是隧道模式)。
 修改模式
R1(config) crypto ipsec transform-set TRANS ah-md5-hmac
R1(cfg-crypto-trans) mode ?
transport transport (payload encapsulation) mode
tunnel tunnel (datagram encapsulation) mode

R1(cfg-crypto-trans) mode transport

R1 clear crypto sa
 修改模式
R2(config) crypto ipsec transform-set TRANS ah-md5-hmac
R2(cfg-crypto-trans) mode ?
transport transport (payload encapsulation) mode
tunnel tunnel (datagram encapsulation) mode

R2(cfg-crypto-trans) mode transport

R2 clear crypto sa
当通信点与加密点是一台设备时,建议使用传输模式。
当通信点与加密点不是一台设备时,必须使用隧道模式。
本站声明:网站内容来源于网络,如有侵权,请联系我们,我们将及时处理。
汇鑫科服隶属于北京通忆汇鑫科技有限公司, 成立于2007年,是一家互联网+、物联网、人工智能、大数据技术应用公司,专注于楼宇提供智能化产品与服务。致力服务写字楼内发展中的中小企业 ,2009年首创楼宇通信BOO模式,以驻地网运营模式为楼宇提供配套运营服务;汇鑫科服始终以客户管理效率为导向,一站式 ICT服务平台,提升写字楼办公场景的办公效率和体验;


